As a child, autumn’s apple harvest in my grandparents’ orchard was a cherished memory. The joy of biting into a fresh apple was undeniable, but there’s magic in savouring that same apple during winter. The key? Natural apple preservation.
In this guide, we’ll explore chemical-free methods to extend apple season, embrace sustainability, and relish homemade apple goodness year-round.
Freezing
Whether you’ve plucked apples from your backyard tree or found a local orchard gem, freezing them allows you to savour the crispness and sweetness all year round. Begin by washing, peeling, and slicing the apples to your preferred thickness. You can choose to leave the skin on for a burst of colour and added fibre.
The trick to successful apple freezing is the process of flash freezing. Lay out your apple slices on a baking sheet in a single layer, making sure they don’t touch. Pop the tray into the freezer for a few hours, or until the slices are frozen solid.
Once they’re icy, transfer them to airtight freezer bags, removing excess air, and don’t forget to label the bags with the date and apple type for easy identification. I love the fact that when you’re ready to use them, there’s no need to thaw. Throw frozen apple slices into your pies, cobblers, or crisps without hesitation.
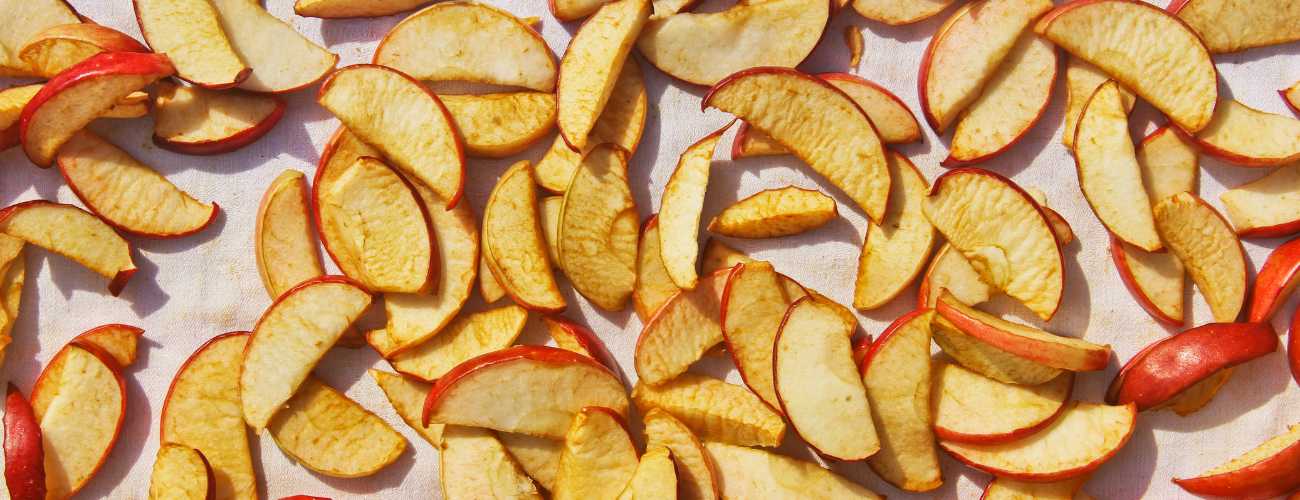
Drying/dehydration
Homemade dried apples are the perfect snack option, free from added sugars and chemicals, and suitable for both kids and adults. They’re also a fantastic addition to granola, cereal, or your favourite trail mix. To begin drying apples, wash, peel, and core them, and consider leaving the skin on for a touch of texture and colour.
Slice the apples into even pieces, aiming for about a quarter-inch thickness. To prevent browning, you can briefly soak the slices in a mixture of lemon juice and water. Arrange the apple slices on dehydrator trays or baking sheets lined with parchment paper, ensuring they don’t overlap.
The key is patience, as this process can take several hours. Dehydrate the slices at a low temperature, usually around 130-160°F (55-70°C), until they’re pliable but no longer sticky. Once they reach this state, they’re ready for munching. As a child, I loved stealing a few slices from my nan’s dehydrator when they were still warm.
Canning: Sealing Sweet Memories
To get started, wash, peel, and slice your apples, ensuring any blemishes or bruised areas are removed. Prepare a canning syrup by dissolving sugar in water, adjusting the sweetness to your preference. Heat the syrup, add your apple slices, and simmer until they’re heated through.
Once hot, pack the apple slices into sterilized canning jars, leaving the recommended headspace. The beauty of canning lies in its ability to infuse unique flavours into your preserved apples. I definitely recommend adding cinnamon sticks, cloves, or a touch of honey for an extra dimension of taste. Seal the jars with sterilized lids and bands, ensuring they’re tightened just enough-finger-tight is perfect.
Depending on your chosen canning method (water bath or pressure canning) and the type of apples you’re preserving, follow the recommended processing times. Allow the jars to cool naturally, and you’ll hear that satisfying “pop” as the lids seal properly. Check the seals by pressing the centre of the lids; they should be concave and not pop back. Canned apples are a versatile addition to your pantry. I use them in pies, tarts, or as a sweet topping for pancakes or waffles.

Apple Sauce
It’s a versatile condiment that can be enjoyed on its own, paired with pork dishes, or used as a baking ingredient. To prepare apple sauce, wash, peel, and slice your apples, removing any unwanted parts. Cook the apples in a saucepan with a bit of water until they’re soft and easily mashed.
You can add sugar or spices like cinnamon for flavour, or leave it unsweetened for a naturally tart option. Mash the cooked apples to your desired consistency, whether you prefer chunky or silky-smooth sauce. Then, simply transfer the apple sauce into clean, sterilized jars and let it cool. Refrigerate for short-term use or freeze for longer storage.

Apple Leather
My kids love eating apple leather and I am so happy that they are eating a totally natural fruit snack! It’s also an excellent addition to granola or as an ingredient for homemade energy bars. To create apple leather, wash, peel, and slice your apples, removing any blemishes. In a blender or food processor, puree the apple slices until you have a smooth mixture.
You can add a bit of lemon juice to prevent browning. Spread the apple puree onto a lined baking sheet or dehydrator tray in a thin, even layer. The goal is to create a consistent thickness to ensure even drying. Dehydrate the puree at a low temperature (around 130-160°F or 55-70°C) until it’s pliable but no longer sticky.
This may take several hours, so be patient. Once your apple leather is ready, let it cool slightly, then carefully peel it from the parchment paper. Roll it up and cut it into strips or squares for easy snacking. Store your homemade apple leather in an airtight container in a cool, dry place.
Apple Chutney: A Tangy Delight
It’s a great condiment that pairs perfectly with cheese, crackers, or roasted meats. To make apple chutney, wash, peel, and chop your apples into small, even pieces. Combine the apples with vinegar, sugar, and spices like cinnamon, cloves, or ginger in a saucepan.
You can also add onions, raisins, or chillies for extra flavour. Simmer the mixture until the apples soften and the chutney thickens to your liking. Adjust the sweetness and spiciness during cooking to suit your taste. Once your apple chutney reaches a thicker consistency, remove it from heat and let it cool. Spoon it into clean, sterilised jars and store them in the refrigerator for shorter-term use or freeze them for longer storage.

Apple Cider Vinegar
Did you know that you can utilise all the apple peels from your preservation projects to make apple cider vinegar? It’s not only a perfect ingredient for dressings and marinades but also has various potential health benefits.
To make apple cider vinegar, gather apple peels and cores from your previous apple projects or use whole apples. Place them in a clean, sterilized glass jar or crock. Cover the apple scraps with filtered water, ensuring they are fully submerged. Add a bit of sugar to kickstart the fermentation process. Cover the jar or crock with a clean cloth secured with a rubber band to allow air circulation while keeping out debris. Store it in a dark, cool place for about 3-4 weeks, stirring the mixture daily. You’ll notice the liquid gradually transforming into vinegar.
Taste it along the way to determine when it reaches the desired acidity. Once it’s ready, strain out the solids and transfer the liquid into clean, sterilized bottles or jars. Seal them and store your homemade apple cider vinegar in the refrigerator for extended use.
Hopefully, by now, you found at least a couple of ways to preserve apples naturally which is to your taste. Each of these apple preservation methods offers a unique way to savour the taste of apples throughout the year in a delicious and natural way.
I encourage you to read my blog on natural fruit preservation if you would like to learn more on how to preserve fruit.
So, as you embark on your own apple preservation journey, remember that the beauty of natural preservation lies not only in the taste of the final product but also in the process itself. It’s a journey that connects you to tradition, to the land, and to the joy of savouring every bite of that homemade apple goodness.